
色环设计

2022-2-28 ~ 2022-5-24
(1)
程序简介
该程序实现了一个色圈旋转的功能,本来的目的是通过色圈的旋转和圈内的箭头的指向误导人视觉感知。但是我发现并不是我所看到的那样,虽然色圈旋转了,箭头也指向了特定的位置,但是并没有给人相应的感觉。由于该视觉错觉的动态图我是通过一个视频看到的,底下好多人说圈动了,也有人说没有动,具体动了没,只有实践才是检验真理的唯一标准。
编写过程
这里我使用了绘制扇形的函数,通过 for 循环,控制绘制的弧度,并且通过控制颜色,这里我使用的是 HSV 颜色模式,刚好对应循环的次数。对于绘制箭头,我通过设置箭头的大小尺寸,坐标位置,以及箭头指向等属性,我首先通过箭头的坐标位置以及它的尺寸,通过公式表达出一个箭头向上的所有坐标位置,然后通过旋转公式计算出所有箭头方向所对应的坐标位置。针对以上函数的设计,我们就可以绘制任意位置,任意大小,任意方向的箭头。
创新的地方
- 可取之处有箭头绘制技巧。
- 一个色盘的绘制技巧。
- 图像旋转技巧。
程序截图

图一 色盘
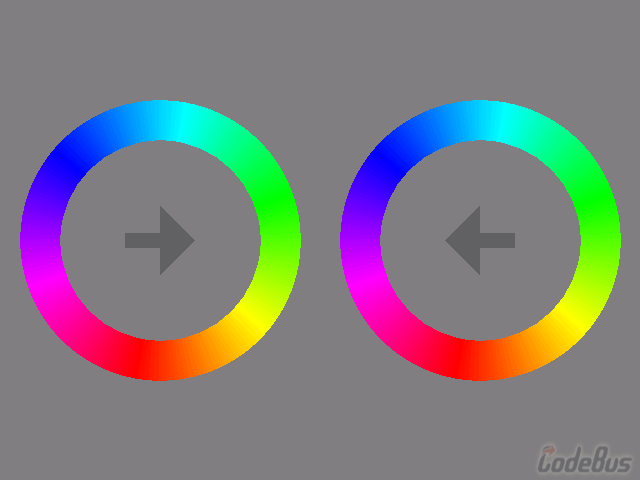
图二 色圈旋转
源码
///////////////////////////////////////////////////
// 程序名称:色环视错觉实验
// 编译环境:Mictosoft Visual Studio 2013, EasyX_20200315(beta)
// 作  者:luoyh <2864292458@qq.com>
// 最后修改:2022-2-28
//


#include<graphics.h>
#include<conio.h>
#include<math.h>
#include<time.h>

#define PI acos(-1.0)

void DrawColorCircle(int x, int y, int r, int h);
void HpSleep(int ms);
void Arrow(int size, int x, int y, int direction);

int main()
{
	initgraph(640, 480);
	setbkcolor(RGB(128, 126, 129));
	cleardevice();
	int h = 0;
	BeginBatchDraw();
	while (true)
	{
		DrawColorCircle(640 / 4, 480 / 2, 140, h);
		DrawColorCircle(640 * 3 / 4, 480 / 2, 140, h);
		setfillcolor(RGB(128, 126, 129));
		solidcircle(640 / 4, 480 / 2, 100);
		solidcircle(640 * 3 / 4, 480 / 2, 100);
		Arrow(70, 640 / 4, 480 / 2, 3);
		Arrow(70, 640 * 3 / 4, 480 / 2, 2);
		h += 5;
		HpSleep(5);
		FlushBatchDraw();
		cleardevice();
		h = h % 360;
	}
	EndBatchDraw();
	_getch();
	return 0;
}

void DrawColorCircle(int x, int y, int r, int h)
{
	int H = h;
	float S = 1.f;
	float V = 1.f;

	for (int i = 0; i < 360; i++)
	{
		H = int(H + 1) % 360;
		setfillcolor(HSVtoRGB((float)H, S, V));
		solidpie(x - r, y - r, x + r, y + r, i * (PI / 180), (i + 1) * (PI / 180));
	}
}

// 精确延时函数(可以精确到 1ms,精度 ±1ms)
// 记得加头文件 time.h
// by yangw80<yw80@qq.com>, 2011-5-4
void HpSleep(int ms)
{
	static clock_t oldclock = clock();			// 静态变量,记录上一次 tick
	oldclock += ms * CLOCKS_PER_SEC / 1000;		// 更新 tick
	if (clock() > oldclock)						// 如果已经超时,无需延时
		oldclock = clock();
	else
	while (clock() < oldclock)					// 延时
		Sleep(1);								// 释放 CPU 控制权,降低 CPU 占用率
}

void Arrow(int size, int x, int y, int direction)
{
	setfillcolor(RGB(97, 97, 99));
	POINT pos[] =
	{ { x - size / 2, y },
	{ x - size / 8, y },
	{ x - size / 8, y + size / 2 },
	{ x + size / 8, y + size / 2 },
	{ x + size / 8, y },
	{ x + size / 2, y },
	{ x, y - size / 2 } };

	POINT pox[7], poz[7], poy[7];
	for (int i = 0; i < 7; i++)
	{
		pox[i].x = (int)((pos[i].x - x) * cos(180.0 * PI / 180.0) + (pos[i].y - y) * sin(180.0 * PI / 180.0)) + x;
		pox[i].y = (int)(-(pos[i].x - x) * sin(180.0 * PI / 180.0) + (pos[i].y - y) * cos(180.0 * PI / 180.0)) + y;

		poz[i].x = (int)((pos[i].x - x) * cos(90.0 * PI / 180.0) + (pos[i].y - y) * sin(90.0 * PI / 180.0)) + x;
		poz[i].y = (int)(-(pos[i].x - x) * sin(90.0 * PI / 180.0) + (pos[i].y - y) * cos(90.0 * PI / 180.0)) + y;

		poy[i].x = (int)((pos[i].x - x) * cos(-90.0 * PI / 180.0) + (pos[i].y - y) * sin(-90.0 * PI / 180.0)) + x;
		poy[i].y = (int)(-(pos[i].x - x) * sin(-90.0 * PI / 180.0) + (pos[i].y - y) * cos(-90.0 * PI / 180.0)) + y;
	}
	switch (direction)
	{
	case 0:solidpolygon(pos, 7); break;		// 上
	case 1:solidpolygon(pox, 7); break;		// 下
	case 2:solidpolygon(poz, 7); break;		// 左
	case 3:solidpolygon(poy, 7); break;		// 右
	}
}
int as = 0, as1 = 0;
Arrow(50, 640 / 4, 480 / 2, as);
Arrow(50, 640 * 3 / 4, 480 / 2, as);
as1++;
if (as1==800)
{
as = 0;
}
if (as1 == 1000)
{
as = 3;
}
if (as1 == 1800)
{
as = 1;
}
if (as1 == 2600)
{
as = 0;
}
if (as1 == 3400)
{
as1 = 0;
}