使用 EasyX 实现 UI 原理教程(章二 绘图单元)
布局在一个界面上的形形色色的控件我们都可以叫他为一个单元 ( cell )。

如上图所示,任意一个控件(不论它是否能与用户发生交互,图形规律与否)都是一个单元, 上一篇文章 我们已经学会了触发器以及相关实现,那么,我们将一个控件比作一个动物细胞,我们可以说触发器是细胞核,而绘图单元则是细胞膜,两者缺一不可,触发器负责处理用户点击,而绘图单元则负责展示画面。
接下来,我们将上一篇文章所写的触发器封装为 “trigger.h”(文件内容上一章已标注),然后再来开始今天的代码学习,由刚刚的介绍我们知道,绘图单元是负责将控件画出来的,所以不同的控件要拥有不同的绘图单元,那么我们首先创建一个根据图形贴图的绘图单元,因为绘图单元和触发器缺一不可,所以我们的绘图单元要派生于异形触发器 "geometry_trigger" 类。
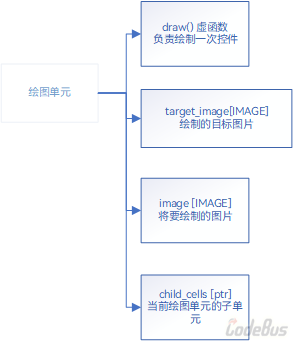
接下来,我们来大概设计一下一个基础的贴图绘图单元:

这边解释一下为什么要有 child_cells 与 target_image 这两个成员:
- child_cells 主要是为了用户自己自定义控件的美化。
- 很多时候,我们并不是直接将控件内容画到默认绘图设备上的。
注意 draw() 应为虚函数用于继承
而且为了贴图的质量,我们应使用 alphablend 函数来确保贴图透明 (相关知识请见慢羊羊的此篇文章)。
这里再将 cell 分成两种
- 负责绘制图片的 image_cell
- 负责绘制文字的 text_cell
且 text_cell 继承于 image_cell
因为逻辑较为简单,所以这次不先用伪代码疏通逻辑了,直接上写好的代码让同学们参考
////////////////////////////////////
//      	  cell.h
// <创 建 时 间> : 2021/11/13
// <最后修改时间> : 2021/11/13
// <作      者>  : Margoo
// <邮      箱>  : 1683691371@qq.com
//
#pragma once

#include "trigger.h"

#include <string>

// 为了使用透明贴图函数
#pragma comment(lib, "MSIMG32.LIB")

// 重载EasyX的putimage函数以实现透明贴图
void putimage(IMAGE* image, IMAGE* target_image, int x, int y)
{
	HDC image_hdc = GetImageHDC(image);
	HDC target_hdc = GetImageHDC(target_image);

	BLENDFUNCTION function = { AC_SRC_OVER, 0, 255, AC_SRC_ALPHA };

	int width = image->getwidth();
	int height = image->getheight();

	AlphaBlend(target_hdc, x, y, width, height, image_hdc, 0, 0, width, height, function);
}

class image_cell :
	public geometry_trigger
{
public:
	// 被绘制的图片
	IMAGE* image;
	// 目标图片
	IMAGE* target;

	// 子对象
	image_cell* child = nullptr;

public:
	image_cell(IMAGE* init_image = nullptr, IMAGE* init_target = nullptr)
		: image(init_image), target(init_target)
	{

	}

	virtual void draw()
	{
		// 绘制图片
		putimage(image, target, x, y);

		// 子对象绘制
		if (child != nullptr)
		{
			child->target = target;
			child->draw();
		}
	}
};

class text_cell :
	public image_cell
{
public:
	std::wstring text;

	LOGFONT      style;
	short		 mode;

public:
	text_cell(std::wstring init_text, LOGFONT init_style, short init_mode = TRANSPARENT)
		: text(init_text), style(init_style), mode(init_mode)
	{

	}

	virtual void draw()
	{
		// 先保存旧主题
		LOGFONT save_style;

		auto bk_style = getbkmode();
		gettextstyle(&save_style);

		settextstyle(&style);
		setbkmode(mode);

		SetWorkingImage(target);

		// 输出文字
		outtextxy(x, y, text.c_str());

		// 重设主题
		settextstyle(&save_style);
		setbkmode(mode);

		// 子对象绘制
		if (child != nullptr)
		{
			child->target = target;
			child->draw();
		}
	}
};

// 测试代码
int main()
{
	initgraph(640, 480);

	LOGFONT style;

	gettextstyle(&style);

	text_cell test(L"test", style);

	test.x = 80;
	test.y = 80;

	test.draw();

	_getch();

	return 0;
}
这篇文章就这样结束了,同学们不要觉得这篇文章的内容简单就忽视或者是忽略,这些内容到后面将会是非常重要的内容,否则我也不会特地开一篇文章来介绍这个绘图单元一步一步脚踏实地!
并且同第一章一样,我们将它封装为 cell.h ,具体代码如下:
////////////////////////////////////
//      	  cell.h
// <创 建 时 间> : 2021/11/13
// <最后修改时间> : 2021/11/13
// <作      者>  : Margoo
// <邮      箱>  : 1683691371@qq.com
//
#pragma once

#include "trigger.h"

#include <string>

// 为了使用透明贴图函数
#pragma comment(lib, "MSIMG32.LIB")

// 重载EasyX的putimage函数以实现透明贴图
void putimage(IMAGE* image, IMAGE* target_image, int x, int y)
{
	HDC image_hdc = GetImageHDC(image);
	HDC target_hdc = GetImageHDC(target_image);

	BLENDFUNCTION function = { AC_SRC_OVER, 0, 255, AC_SRC_ALPHA };

	int width = image->getwidth();
	int height = image->getheight();

	AlphaBlend(target_hdc, x, y, width, height, image_hdc, 0, 0, width, height, function);
}

class image_cell :
	public geometry_trigger
{
public:
	// 被绘制的图片
	IMAGE* image;
	// 目标图片
	IMAGE* target;

	// 子对象
	image_cell* child = nullptr;

public:
	image_cell(IMAGE* init_image = nullptr, IMAGE* init_target = nullptr)
		: image(init_image), target(init_target)
	{

	}

	virtual void draw()
	{
		// 绘制图片
		putimage(image, target, x, y);

		// 子对象绘制
		if (child != nullptr)
		{
			child->target = target;
			child->draw();
		}
	}
};

class text_cell :
	public image_cell
{
public:
	std::wstring text;

	LOGFONT      style;
	short		 mode;

public:
	text_cell(std::wstring init_text, LOGFONT init_style, short init_mode = TRANSPARENT)
		: text(init_text), style(init_style), mode(init_mode)
	{

	}

	virtual void draw()
	{
		// 先保存旧主题
		LOGFONT save_style;

		auto bk_style = getbkmode();
		gettextstyle(&save_style);

		settextstyle(&style);
		setbkmode(mode);

		SetWorkingImage(target);

		// 输出文字
		outtextxy(x, y, text.c_str());

		// 重设主题
		settextstyle(&save_style);
		setbkmode(mode);

		// 子对象绘制
		if (child != nullptr)
		{
			child->target = target;
			child->draw();
		}
	}
};
下一篇,我们将会开始正式介绍一个 UI 的结构构造,然后开始让同学们写一个基于 EasyX 的 UI 库,敬请期待~

添加评论
取消回复